


Hello! Welcome to another Fire Emblem Fates Modding Tutorial. We are going to cover sprites and how to get started with editing them. This tutorial will having a table of contents that will guide you to what you're looking for. So then, lets get started!
Before We Begin
I would like to thank Moonling for their BCH tool. They made it easier for us to edit the file formats.
I would like to thank Thane98 for creating Paragon, allowing us to mod the game.
Prerequisites
You will need the following items:
- Moonling's BCH tool by Moonling
- Paragon by Thane98
- A dump of Fates
- A photo editing software - GIMP, photoshop, or whatever you prefer
- An idea on how to edit these sprite sheets.
Getting Started
I will be separating this into 3 parts. Head, Body, and Special. Before I do any of that, we need to get a sprite sheet for reference. In this example, I will grab my base template for what I used to make Grey from Shadows of Valentia in fates. If you did my Classes guide, this should be pretty easy to learn.First, we're going to navigate to the Classes tab of Paragon and find ourselves a template for the body. Choose any class you'd like to work off of. This will be your general template, regardless if you're a seasoned artist or brand-new to the craft. I will be choosing Ike's vanguard class for this example.


Navigate to your Fates dump unit folder. You'll see 4 folders. The main 3 we will focus on today are "Body", "Head," and "Unique". Go into body and search for your folder. Here is my example.

Copy and paste this somewhere you'll remember. Do the same thing for your head choice. If you did my Characters tutorial, then that part shouldn't be too hard. We're going to move on to the Body sprites, but Unique sprites work about the same way. We'll go over the rest later.
Sprite Numbers and Kanji's
When you're done grabbing your files, you'll notice that when you open it, you're going to notice the set of files in there. There will be 4 sets of 0's and 4 sets of 1's. Here are what the numbers represent.
0 - Idle
1 - Moving
Next to the numbers are kanji's. Each kanji is for a team/faction in the game. Here are what the kanji's mean.
紫 - Valla (Purple Sprite)
緑 - Ally
赤 - Enemy
青 - Player
If you put the numbers together with the kanji, then its obvious what each one means. Alright, now that we got everything cleared, lets talk about each sprite.
Body
The body sprite has one extra special file within it. It is called the "anime.bin" and it controls how the sprite is positioned, along with the head sprite itself. Since we're using Ike's body sprite for vanguard, we won't be touching on it.
We're going to open one of the sprite sheet files using the BCH tool, as seen below.

Export the image somewhere you'll remember it and begin your sprite editing on an image editing software. Export it as a PNG and save it.
What I'm going to do now is import the new image as seen here. You're going to notice on the right that the sprite is cut out with white and some parts are gray. You don't want that white at all. It will make your sprite INVISIBLE in game. You're going to "Export Split" the image and save it somewhere.

From here, we're going to take the white cut out alpha image into an image editing software
IMPORTANT -
The alpha layer color must be hex code "666666". This is the color all alpha's for bodies have.

Once you're done do the following.
- Save the image as a PNG
- Go back to BCH tool
- Click on "Import Split"
- Choose the color image first
- Then choose the alpha image
When you're finished, it should look something like this.

Once you are finished, click "Save" and choose the file you're overriding.
That's it, you're done with the body! What you want to do next is name the folder after the class. For example, if your Class name is "JID_BananaKnight", you want to name the folder "BananaKnight". Stick it in the "Body" folder of your fates mod output and you're solid.
Head
If I'm going to be honest, the process above is basically the same here. The ONLY difference is the Alpha layer for heads must be "888888". So, just do everything mentioned above.
Heads are in the "Head" folder of the dump and to find a head, use the Characters Module for the name. Here's a reference in the Character guide on how to find it.
Unique
So these sprite sheets are special in their own way. Classes that are "Unique" do not need a head from the "Head" folder. It is an all in one sprite sheet. You can look at Azura's sprite sheet for her class. Simply look up her class and you'll find it inside the unique folder. Here is an image of her class sprite sheet.

On the left is her 青1 sprite sheet and on the right is her 青0 sprite sheet. Do as what you've been doing above with the other sprites and you're solid to continue.
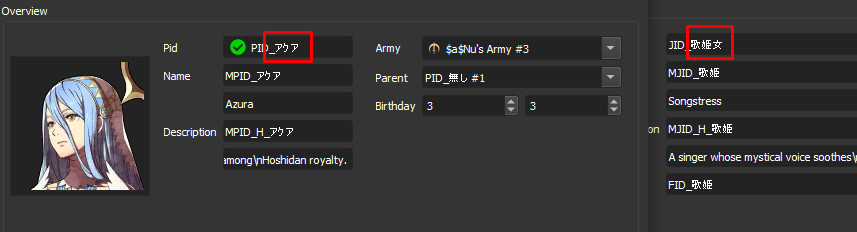
The last step for uniques are to rename it properly. Here is the format. "Class_Character"
Azura's Folder name for songstress is 歌姫女_アクア. On the left is Songstress and on the right is her name internally. Here is proof of it.
Conclusion
Once you're finished, the head and body should show up for the character. Here's an example if you were successful
.

That should be it! You're ready to start your art journey of sprites! If you have any questions, please leave them in the comments and be as clear as possible. If you'd like to contact me, please join my Discord! I'm active in there everyday.