This tutorial is a guide on how to make a simple custom track on a beginner level since blender requires a bit of skill to use, Let's get into this you can also check out what courses i have made with the program too here
https://gamebanana.com/mods/469445
https://gamebanana.com/mods/462283
https://gamebanana.com/mods/422889
Hopefully this helped out!
https://gamebanana.com/mods/469445
https://gamebanana.com/mods/462283
https://gamebanana.com/mods/422889
A MK8D Dumped game (i am not telling you how to get the roms/dumps the yar harr way.)
A pc, duh
Roblox studio (you do need an account) https://create.roblox.com/
Blender (i recommend 3.3 or lower if you are facing bake issues) https://builder.blender.org/download/daily/archive/
Cats blender plugin https://github.com/absolute-quantum/cats-blender-plugin
the start grid (this can be used to make proper road sizes) https://create.roblox.com/store/asset/9691955785
flat plane (for the collision) https://create.roblox.com/store/asset/9691922213
switch toolbox (if you are making the minimap) https://github.com/KillzXGaming/Switch-Toolbox
track studio https://github.com/MapStudioProject/Track-Studio
Buildv4 plugin https://create.roblox.com/store/asset/143383965
Use Buildv4 staging if you have gui problems https://create.roblox.com/store/asset/916928725/Build-v4-Staging?pagePosition=0
A switch or switch emulator (i recommend ryujinx)
Now that you have everything, go to https://create.roblox.com/
you should be met with the screen to Start creating button
Click on start creating and it will download roblox studio (if you did not install it yet) press on the windows key and search for Roblox studio, open it and login if you are prompt to, you can choose browser or within studio, now that you are here click on baseplates either one
.png")
Let the baseplate load up and go to your explorer tab to the right, hover over Workspace and click on the + icon, and then select folder
.png")
.png")
Now, you need 2 folders one for your visual model and one for your collision like seen here: (map isn't needed unless you are planning to make a minimap for your course)
.png")
Now that you have those in, go to your visual folder, hover over, click on the + icon again and select folder, this will be used for our road model, rename the folder to road too!
.png")
.png")
Now we need the start grid to make a proper road size, go to your toolbox to the left of the screen, click on the 4 blocks to the right of the shopping bag icon, and the select My Models to My Meshes, your startgrid should be there and just drag and drop onto your baseplate
.png")
Now you need a part for your road to compare to the start grid, move your mouse up to Model, Part tab and then Block
.png")
Now that the part is on the baseplate, drag and drop it into the road folder under the visual folder and scale the part to around 27 studs across
.png")
Now go to your plugins tab and click on buildv4, a gui will open up to the left and then click on terrain, move to your road part and click on the side, a new part will be created
.png")
Now you can go ahead and create a simple layout anyway you like, make sure to put folders like grass, cliffs, road, trees etc and put their parts into their folders like so:
.png")
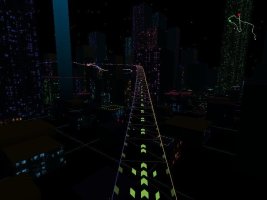
Once you get the hang of it, it will look like a simple course like this
.png")
Now it's time for the collision as what you did for your visual folder you need to do the same for your collision too
.png")
Since this is used for the road, it goes into the road folder under collision and make sure to scale your collision mesh along the road, this will avoid clipping through the floor of your visual
you can add in a different type of collision by naming something like trick, the collision to trick off a ramp
.png")
Once you have done all that for your trees, grass, walls whatever make sure there is no overlapping parts that makes them flicker in your visual model, to avoid this go click on every part such as the cliffs by holding shift and L Click and then go up to your models tab and select union, this will merge your parts into 1 mesh
Now that you made sure there is no flickering, go to each folder, right click and export section and export as obj, as again make 2 folders for your course one for visual, and one for collision.
now it's time to move to blender
you should be met with the screen to Start creating button
Click on start creating and it will download roblox studio (if you did not install it yet) press on the windows key and search for Roblox studio, open it and login if you are prompt to, you can choose browser or within studio, now that you are here click on baseplates either one
Let the baseplate load up and go to your explorer tab to the right, hover over Workspace and click on the + icon, and then select folder
Now, you need 2 folders one for your visual model and one for your collision like seen here: (map isn't needed unless you are planning to make a minimap for your course)
Now that you have those in, go to your visual folder, hover over, click on the + icon again and select folder, this will be used for our road model, rename the folder to road too!
Now we need the start grid to make a proper road size, go to your toolbox to the left of the screen, click on the 4 blocks to the right of the shopping bag icon, and the select My Models to My Meshes, your startgrid should be there and just drag and drop onto your baseplate
Now you need a part for your road to compare to the start grid, move your mouse up to Model, Part tab and then Block
Now that the part is on the baseplate, drag and drop it into the road folder under the visual folder and scale the part to around 27 studs across
Now go to your plugins tab and click on buildv4, a gui will open up to the left and then click on terrain, move to your road part and click on the side, a new part will be created
Now you can go ahead and create a simple layout anyway you like, make sure to put folders like grass, cliffs, road, trees etc and put their parts into their folders like so:
Once you get the hang of it, it will look like a simple course like this
Now it's time for the collision as what you did for your visual folder you need to do the same for your collision too
Since this is used for the road, it goes into the road folder under collision and make sure to scale your collision mesh along the road, this will avoid clipping through the floor of your visual
you can add in a different type of collision by naming something like trick, the collision to trick off a ramp
Once you have done all that for your trees, grass, walls whatever make sure there is no overlapping parts that makes them flicker in your visual model, to avoid this go click on every part such as the cliffs by holding shift and L Click and then go up to your models tab and select union, this will merge your parts into 1 mesh
Now that you made sure there is no flickering, go to each folder, right click and export section and export as obj, as again make 2 folders for your course one for visual, and one for collision.
now it's time to move to blender
Now that you have exported your objects, its time to resize them in blender
Open blender and you are met with a cube, lighting and a camera
.png")
Go ahead and delete those by dragging or selecting all of them and press on the X key to delete and then click on delete
Now press on the N key to bring up view and set these values:
Clip Start 1
End 10000000
.png")
Once that is set up go to file>import>Wavefront .obj and import your visual models that you exported from roblox studio earlier
.png")
Now your entire visual is imported into blender, do the same for your collision too
but setup 2 collections, one for your visual and one for your collision
.png")
your model will appear too small for the game, so click on each part of your visual model and set the size from 1 to 10 or 11
.png")
.png")
You can also do this by pressing the S key and the clicking and set the size that way
You should do this with your collision too
Now that you have everything setup this is where Cats plugin will come into play, go ahead and go to edit>prefs>addons and install the cats blender plugin zip
a new tab called CATS will be added, click that and then select every part of your visual and click on Material, this will turn your materials into objects
.png")
Now that everything has been applied it's time to make the textures
Got here, and then select texture, this will render your texture
.png")
And then click and drag on the corner
.png")
here it will open a new window, then click this icon to change to uv mapping
.png")
.png")
Move to the bottom and drag the edge, click on this button and change to shader editor
.png")
Before you apply your textures we need to delete and rename the materials to their part names
Go click on the grid ball icon, move to your material and then click on - to remove the material, and then click on + to add a new material and then rename it
.png")
.png")
Do this for all of your models and once your done move to the bottom to your shader editor
click on add, texture and image texture you should now have a blank texture
On the image select the folder and select it's texture and click ok
now your image will be applied
.png")
Do this for each of your parts, if you get something like this
.png")
Go to edit mode, Press A and then go to UV editing, press A again and scale the texture size down
now it will look like this
.png")
Once you have everything set up go to file, export and export your visual as dae and your collision as obj
now off to track studio!
Open blender and you are met with a cube, lighting and a camera
Go ahead and delete those by dragging or selecting all of them and press on the X key to delete and then click on delete
Now press on the N key to bring up view and set these values:
Clip Start 1
End 10000000
Once that is set up go to file>import>Wavefront .obj and import your visual models that you exported from roblox studio earlier
Now your entire visual is imported into blender, do the same for your collision too
but setup 2 collections, one for your visual and one for your collision
your model will appear too small for the game, so click on each part of your visual model and set the size from 1 to 10 or 11
You can also do this by pressing the S key and the clicking and set the size that way
You should do this with your collision too
Now that you have everything setup this is where Cats plugin will come into play, go ahead and go to edit>prefs>addons and install the cats blender plugin zip
a new tab called CATS will be added, click that and then select every part of your visual and click on Material, this will turn your materials into objects
Now that everything has been applied it's time to make the textures
Got here, and then select texture, this will render your texture
And then click and drag on the corner
here it will open a new window, then click this icon to change to uv mapping
Move to the bottom and drag the edge, click on this button and change to shader editor
Before you apply your textures we need to delete and rename the materials to their part names
Go click on the grid ball icon, move to your material and then click on - to remove the material, and then click on + to add a new material and then rename it
Do this for all of your models and once your done move to the bottom to your shader editor
click on add, texture and image texture you should now have a blank texture
On the image select the folder and select it's texture and click ok
now your image will be applied
Do this for each of your parts, if you get something like this
Go to edit mode, Press A and then go to UV editing, press A again and scale the texture size down
now it will look like this
Once you have everything set up go to file, export and export your visual as dae and your collision as obj
now off to track studio!
Open trackstudio and make sure you click on help and check for updates, let the updates install and then click on paths tab and navigate to your mk8d dump and select the folder
.png")
Now go to file>new>custom track and tick on the mk8d map
.png")
Open your visual model and select ok now it should look all white, Oops! let's fix that.
.png")
Go ahead and go to the model tab, move down to textures and right click to import textures, and then click ok when you selected your texture
And then click on the materials folder, select all of them except for your water and move over to properties, click on the folder icon and click on download presets, this will update texture presets
click on normal under opaque
and then select your model part, and change your texture from here
.png")
You can also change the color under params
.png")
If you need textures just open any track model from your MK8D dump and extract the textures from track studio
Once you are done with your visual model it's time to apply the collision, so go over to collision editor
right click on course_kcl and replace the model and set your collision by meshes
click ok and your collision is set
Go to map editor and go to objects, map objects and start and reposition the start object to face towards the start gate
.png")
Once that is done, start setting up like item boxes, road hazards, coins paths and everything and then save the map, visual model and collision files and move these to
(mk8dID)/ModName/romfs/Course/Coursename
i will choose Gu_Expert (shy guy falls)
then boot up MK8D select the track you put the files in and tadahhhh!


Now go to file>new>custom track and tick on the mk8d map
Open your visual model and select ok now it should look all white, Oops! let's fix that.
Go ahead and go to the model tab, move down to textures and right click to import textures, and then click ok when you selected your texture
And then click on the materials folder, select all of them except for your water and move over to properties, click on the folder icon and click on download presets, this will update texture presets
click on normal under opaque
and then select your model part, and change your texture from here
You can also change the color under params
If you need textures just open any track model from your MK8D dump and extract the textures from track studio
Once you are done with your visual model it's time to apply the collision, so go over to collision editor
right click on course_kcl and replace the model and set your collision by meshes
click ok and your collision is set
Go to map editor and go to objects, map objects and start and reposition the start object to face towards the start gate
Once that is done, start setting up like item boxes, road hazards, coins paths and everything and then save the map, visual model and collision files and move these to
(mk8dID)/ModName/romfs/Course/Coursename
i will choose Gu_Expert (shy guy falls)
then boot up MK8D select the track you put the files in and tadahhhh!
Hopefully this helped out!