What you will need:
- Nintendo WiFi USB (and the software for it, which can be downloaded here)
- A Windows XP Computer (or a VM with XP) THIS WILL NOT WORK WITH WINDOWS 10
-(Note that other operating systems may also work with this, but this guide will specifically cover Windows XP)
- Access to the internet router your computer is connected to (Port forwarding is involved)
If you don't know what a VM is ignore anything about it and follow the guide normally.
It is recommended to read the guide fully before following the steps.
If any issues occur, scroll down to the Troubleshooting section at the bottom.
Initial Setup:
- Install the WiFi USB Software by going in the NintendoWFCReg folder and launching "setup".
- Have the USB plugged in while installing (if using a VM have the device direct to the VM).
- Test the connection to make sure the USB works:
- On your DS, go into a game's WFC settings and select Connect to your Nintendo Wi-Fi USB Connector.
- Allow it to connect, and a pop-up should appear on your computer.
- Click on the WiFi icon on the bottom right of your desktop:

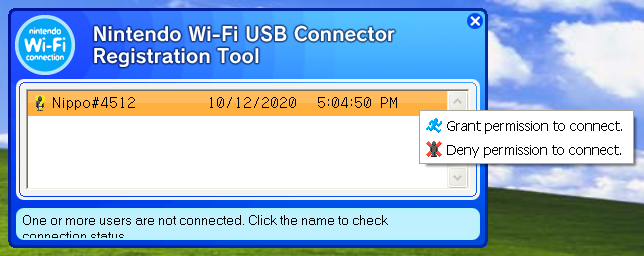
- Click on your name and select Grant permission to connect:

- On your DS it should say the setup has been completed.
- On the connection test it should say Connection Successful.
- Try connecting to Nintendo WFC, it should give you an error message saying WFC has been halted / discontinued.
Connecting to Wiimmfi:
- On your XP computer / VM, go into Control Panel > Network and Internet Connections > Network Connections
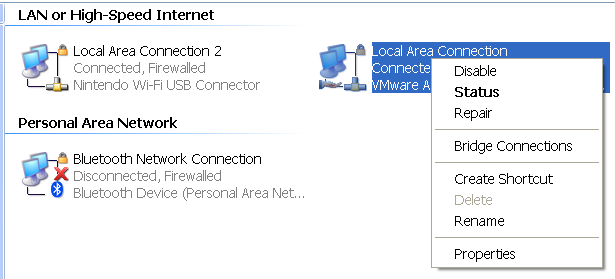
- Two connections should be listed, right click on the one that is NOT the WiFi USB Connector and click Properties:

- In the box scroll down and click "Internet Protocol (TCP/IP)" and click Properties directly underneath.
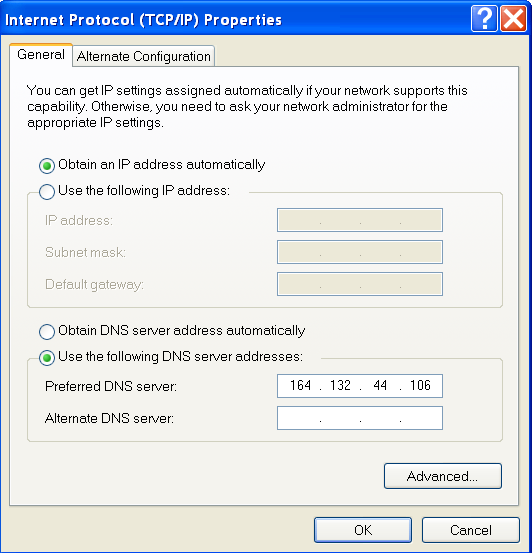
- Leave the IP address to automatic. Click "Use the following DNS server addresses" and type in Wiimmfi's DNS (Do not type anything in the Alternate DNS server)

- Click OK, then Close.
- Make another attempt to connect on your DS. You should get a Connection successful message. Attempting to connect to WFC will still give the discontinued message.
- Open your router's settings (for my router it is http://192.168.1.1/, if you do not know how to get to your router's settings Google it) and Port Forward your computers internet. I will show how I set it up with my router; it should be somewhat similar to yours. My router is a Verizon router.
- Select Port Forwarding, and click Add. Select your computer's IP address and click custom ports. Then click UDP and type 61135.
(Note: if using a VM, click the VM's IP address and not your host computer)

Test the USB connection again, it should say Connection successful. You should now be able to connect to Wiimmfi.
Troubleshooting
When installing the WiFi USB software, the install crashes at setting up internet sharing:
- Go to your network properties > Advanced tab > uncheck the box that says Allow other network users to connect through this computer's Internet connection. Should install properly afterwards.
On USB connection test, error code 52103 (or something similar) appears:
- You have your IP address manually configured, set it to automatic
The WFC discontinued message still appears after following all the steps:
- Double check that you are using the correct IP and that you are port forwarding correctly
- If on a VM use your VM's IP, double click your network and click the support tab to find your IP address
- Try turning off your Firewall on your network by going to your network properties > Advanced tab > under Windows FireWall click the Settings… button > Click "Off (not recommended)"
- Make sure the Alternate DNS server box is blank
If there are any other issues please let me know, I will add it to this bottom section.
- Nintendo WiFi USB (and the software for it, which can be downloaded here)
- A Windows XP Computer (or a VM with XP) THIS WILL NOT WORK WITH WINDOWS 10
-(Note that other operating systems may also work with this, but this guide will specifically cover Windows XP)
- Access to the internet router your computer is connected to (Port forwarding is involved)
If you don't know what a VM is ignore anything about it and follow the guide normally.
It is recommended to read the guide fully before following the steps.
If any issues occur, scroll down to the Troubleshooting section at the bottom.
Initial Setup:
- Install the WiFi USB Software by going in the NintendoWFCReg folder and launching "setup".
- Have the USB plugged in while installing (if using a VM have the device direct to the VM).
- Test the connection to make sure the USB works:
- On your DS, go into a game's WFC settings and select Connect to your Nintendo Wi-Fi USB Connector.
- Allow it to connect, and a pop-up should appear on your computer.
- Click on the WiFi icon on the bottom right of your desktop:
- Click on your name and select Grant permission to connect:
- On your DS it should say the setup has been completed.
- On the connection test it should say Connection Successful.
- Try connecting to Nintendo WFC, it should give you an error message saying WFC has been halted / discontinued.
Connecting to Wiimmfi:
- On your XP computer / VM, go into Control Panel > Network and Internet Connections > Network Connections
- Two connections should be listed, right click on the one that is NOT the WiFi USB Connector and click Properties:
- In the box scroll down and click "Internet Protocol (TCP/IP)" and click Properties directly underneath.
- Leave the IP address to automatic. Click "Use the following DNS server addresses" and type in Wiimmfi's DNS (Do not type anything in the Alternate DNS server)
- Click OK, then Close.
- Make another attempt to connect on your DS. You should get a Connection successful message. Attempting to connect to WFC will still give the discontinued message.
- Open your router's settings (for my router it is http://192.168.1.1/, if you do not know how to get to your router's settings Google it) and Port Forward your computers internet. I will show how I set it up with my router; it should be somewhat similar to yours. My router is a Verizon router.
- Select Port Forwarding, and click Add. Select your computer's IP address and click custom ports. Then click UDP and type 61135.
(Note: if using a VM, click the VM's IP address and not your host computer)
Test the USB connection again, it should say Connection successful. You should now be able to connect to Wiimmfi.
Troubleshooting
When installing the WiFi USB software, the install crashes at setting up internet sharing:
- Go to your network properties > Advanced tab > uncheck the box that says Allow other network users to connect through this computer's Internet connection. Should install properly afterwards.
On USB connection test, error code 52103 (or something similar) appears:
- You have your IP address manually configured, set it to automatic
The WFC discontinued message still appears after following all the steps:
- Double check that you are using the correct IP and that you are port forwarding correctly
- If on a VM use your VM's IP, double click your network and click the support tab to find your IP address
- Try turning off your Firewall on your network by going to your network properties > Advanced tab > under Windows FireWall click the Settings… button > Click "Off (not recommended)"
- Make sure the Alternate DNS server box is blank
If there are any other issues please let me know, I will add it to this bottom section.


