###########################################
##### Boot2vWii Channel Tutorial - Wii U Aroma #####
###########################################
What is Boot2vWii Channel?
With Boot2vWii Channel you can create custom forwarders to use in the Wii U menu and launch channels installed on the Virtual Wii (vWii) skipping all Wiimote prompts.
It can also launch the vWii channel by forcing the screen resolution and turns off the Wii U GamePad.
Project URL - https://github.com/WiiDatabase/Boot2vWii
This tutorial was made using information from the internet, which brings together all the information necessary for you to create your forwarder without difficulties;
The links I used to create this guide will be at the end of the tutorial;
Requirements:
- Wii U with Aroma unlock (Does not work on Tiramisu or Haxchi);
- Computer with Internet and Windows 10 or 11 operating system (64bits);
- Current versions of devkitPPC, wut and wut-tools;
- For the forwarder to work correctly, the vWii will need the application channel installed in (.wad) format;
- Identify the ID and TID of the installed channel to create the command;
###################################################
#### Installing and configuring devkiPro (wut and wut-tool) ####
###################################################
Download and Install devkiPro
https://github.com/devkitPro/installer/releases
https://github.com/devkitPro/installer/releases/download/v3.0.3/devkitProUpdater-3.0.3.exe
Running the installer -
- Welcome to devkitProUpdater Version 3.0.3 > Next
- Install or just download files? > choose preferred option > Next
- Keep downloaded files after indstall? > choose preferred option > Next
- Choose components > deselect all > Next
- Choose Install Location > defaults used > Next
- Choose Start menu Folder > defaults used > Install
Wait for the installation to finish -
- Installation Complete > Next > Finish
Launch MSys2 from the Start menu -
- Start > devkitPro > MSys2
Type the following command to install wiiu-dev and the necessary dependencies (wut and wut-tool) and press enter;
Now type the command below to clone the Boot2vWii repository and press enter
This command clones the repository to "C:\Boot2vWii"
If everything went well, three files will be generated in the "C:/Boot2vWii" folder:
Boot2vWii.elf
Boot2vWii.rpx
Boot2vWii.wuhb
The file with the .wuhb extension is the forwarder that Aroma recognizes.
###################################
##### Creating the custom forwarders #####
###################################
In this part of the tutorial we go to the official repository of the Boot2vWii project.
Boot2vWii Project - https://github.com/WiiDatabase/Boot2vWii
In the repository we have all the information to generate the custom forwarder.
Part01 - Creating custom images for the Wii U menu (PNG)
***Information***
Create or download images of your choice to use in the forwarder.
All images must be in PNG format.
- ICON: For the Wii U menu icon.
Use the dimensions (128x128);
- DRC_SPLASH: To show on the GamePad when the forwarder is loaded.
Use the dimensions (854x480);
- TV_SPLASH: To show on TV when the forwarder is loaded.
Use the dimensions (1280x720);
After creating the desired images, place them in the "C:\Boot2vWii\assets" folder.
The names of the images created will be used to create commands for Msys2.
Part02 - Creating commands to use in MSys2
***Information***
- TID: Title ID of the channel you want to initialize.
The Title ID is the hexadecimal values of the four-letter Title ID used for the channel.
- APP_NAME: Name of the title in the Wii U menu (default is Boot2vWii).
This is the name that will appear when the icon is selected on the Wii U.
- APP_AUTHOR: Homebrew Author
- FORCERES: Forces resolution when initializing a vWii channel.
The supported modes are: NONE, P720 or P480 (The default is NONE). Note that it only works with HDMI.
These values are the main ones to generate a forwarder.
If you don't want the images on the GamePad and on the TV, just don't add them to the command.
The image of the icons is mandatory to generate the forwarder, if it is not found or does not have the image, the command fails.
Example of Commands:
Homebrew Channel (OHBC) - 480p:
Homebrew Channel (OHBC) - 720p:
Homebrew Channel (OHBC):
Nintendont (WWND), but only on the TV:
USB Loader GX (UNEO):
WiiFlow (DWFA):
Part03 - Using the command created in MSys2 and generating the forwarder for Wii U
Launch MSys2 from the Start menu -
- Start > devkitPro > MSys2
Type the command and press enter (Deletes previously created forwarders)
Now paste the command you created and press enter to generate the forwarder
Homebrew Channel (OHBC) - CompatTitleInstaller Official:
The forwarder was generated in the "C:/Boot2vWii" folder as:
Boot2vWii.elf
Boot2vWii.rpx
Boot2vWii.wuhb
The "Boot2vWii.wuhb" file is the forwarder recognized by Aroma, you can delete the other two if you want.
Now just rename it to the name of your choice and copy the files to the Wii U SD card in "SD:/wiiu/apps" or any folder of your choice.
I strongly advise you to create a folder just for forwarders so you can have better management.
*** Extra Information ***
###################################
## Identifying channel IDs (Wad or vWii) ####
###################################
ID and TID
The title ID is the hexadecimal values of the four letters title ID used for the channel.
Example:
WiiFlow
ID = DWFA > TID = 0x0001000144574641
USB Loader GX
ID = UNEO > TID = 0x00010001554e454f
If you have the original wads that were used to install the channels on the vWii side, then the easiest method if you are using Windows is to use ShowMiiWads (I used version 1.5.2 by Leathl (mod by orwel & Brawl)). There is a .NET framework dependency.
ShowMiiWads - https://github.com/modmii/modmii.github.io/raw/master/temp/ShowMiiWads-Mod-1.5.2.zip
Make sure that View is set to ShowMiiWads, then drag your forwarder .wad files to the ShowMiiWads window.
- Title ID is the letter ID that can be used to work out the TID in Boot2vWii
- Alternatively, the Path can be used to easily convert to Boot2vWii TID
Using Nintendont Forwarder - WWND vWii.wad as an example. The Title ID is displayed as WWND and Path as 00010001\57574e44.
00010001\57574e44 converts to TID=0x0001000157574e44
Recognizing channel IDs installed on vWii (Emunand)
If you don't have the original wad files then you can dump the vWii NAND and use ShowMiiWads with View set to ShowMiiNand.
To dump the VWii Nand in a format that can be used by ShowMiiWads, the easiest method I have found is to use USB Loader GX
USB Loader GX - https://github.com/wiidev/usbloadergx
USB Loader GX v3.0-r1281 is used in the following steps:
- Load USB Loader GX
- Edit the path for the NAND backup if required - Settings > Custom Paths > EmuNAND Save Path
- To dump the NAND - Settings > Features > Dump NAND to EmuNAND > Everything
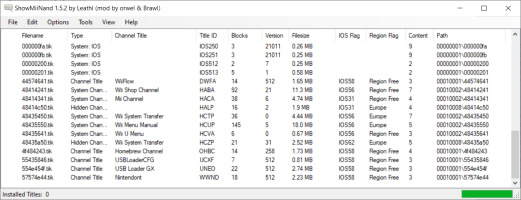
Now in ShowMiiWads:
- Options > Change NAND Backup Path - select folder containing your NAND backup/dump.
- View > ShowMiiNand
Screenshot

I'm sharing the custom forwarders I created for my use, I hope you like them.
Forwarder for WiiU (Aroma)
https://gbatemp.net/attachments/for...446074/?hash=cafaa4aa4eaa8adbba68bec3fc401fdf
Forwarder for WiiU (Aroma) (Complete)
https://www.mediafire.com/file/uezzb6pjgdek8p9/Forwarder_for_WiiU_%28Aroma%29_%28Complete%29.zip/file
Boot2vWii (Project)
https://gbatemp.net/attachments/boot2vwii-project-zip.446075/?hash=cafaa4aa4eaa8adbba68bec3fc401fdf
##############################################
############### Credits and Thanks ###############
##############################################
I would like to thank the developers of the tools and information necessary for me to create this guide, which can help people who are less familiar with the subject.
Without you this tutorial would not exist!
Thanks
WiiDatabase
akadiddy
SammysJunk
FunkyScott47
Useful links
WiiDatabase
https://github.com/WiiDatabase
akadiddy
https://gbatemp.net/threads/boot2vwii-channel.614122/post-10156679
https://gbatemp.net/threads/boot2vwii-channel.614122/post-10158196
SammysJunk
https://github.com/SammyGoesHowdy/SammysJunk/tree/main/Wii U Forwarders
FunkyScott47
##### Boot2vWii Channel Tutorial - Wii U Aroma #####
###########################################
What is Boot2vWii Channel?
With Boot2vWii Channel you can create custom forwarders to use in the Wii U menu and launch channels installed on the Virtual Wii (vWii) skipping all Wiimote prompts.
It can also launch the vWii channel by forcing the screen resolution and turns off the Wii U GamePad.
Project URL - https://github.com/WiiDatabase/Boot2vWii
This tutorial was made using information from the internet, which brings together all the information necessary for you to create your forwarder without difficulties;
The links I used to create this guide will be at the end of the tutorial;
Requirements:
- Wii U with Aroma unlock (Does not work on Tiramisu or Haxchi);
- Computer with Internet and Windows 10 or 11 operating system (64bits);
- Current versions of devkitPPC, wut and wut-tools;
- For the forwarder to work correctly, the vWii will need the application channel installed in (.wad) format;
- Identify the ID and TID of the installed channel to create the command;
###################################################
#### Installing and configuring devkiPro (wut and wut-tool) ####
###################################################
Download and Install devkiPro
https://github.com/devkitPro/installer/releases
https://github.com/devkitPro/installer/releases/download/v3.0.3/devkitProUpdater-3.0.3.exe
Running the installer -
- Welcome to devkitProUpdater Version 3.0.3 > Next
- Install or just download files? > choose preferred option > Next
- Keep downloaded files after indstall? > choose preferred option > Next
- Choose components > deselect all > Next
- Choose Install Location > defaults used > Next
- Choose Start menu Folder > defaults used > Install
Wait for the installation to finish -
- Installation Complete > Next > Finish
Launch MSys2 from the Start menu -
- Start > devkitPro > MSys2
Type the following command to install wiiu-dev and the necessary dependencies (wut and wut-tool) and press enter;
Code:
pacman -S wiiu-devNow type the command below to clone the Boot2vWii repository and press enter
Code:
cd c:
git clone https://github.com/WiiDatabase/Boot2vWii.git
cd Boot2vWii
make
This command clones the repository to "C:\Boot2vWii"
If everything went well, three files will be generated in the "C:/Boot2vWii" folder:
Boot2vWii.elf
Boot2vWii.rpx
Boot2vWii.wuhb
The file with the .wuhb extension is the forwarder that Aroma recognizes.
###################################
##### Creating the custom forwarders #####
###################################
In this part of the tutorial we go to the official repository of the Boot2vWii project.
Boot2vWii Project - https://github.com/WiiDatabase/Boot2vWii
In the repository we have all the information to generate the custom forwarder.
Part01 - Creating custom images for the Wii U menu (PNG)
***Information***
Create or download images of your choice to use in the forwarder.
All images must be in PNG format.
- ICON: For the Wii U menu icon.
Use the dimensions (128x128);
- DRC_SPLASH: To show on the GamePad when the forwarder is loaded.
Use the dimensions (854x480);
- TV_SPLASH: To show on TV when the forwarder is loaded.
Use the dimensions (1280x720);
After creating the desired images, place them in the "C:\Boot2vWii\assets" folder.
The names of the images created will be used to create commands for Msys2.
Part02 - Creating commands to use in MSys2
***Information***
- TID: Title ID of the channel you want to initialize.
The Title ID is the hexadecimal values of the four-letter Title ID used for the channel.
- APP_NAME: Name of the title in the Wii U menu (default is Boot2vWii).
This is the name that will appear when the icon is selected on the Wii U.
- APP_AUTHOR: Homebrew Author
- FORCERES: Forces resolution when initializing a vWii channel.
The supported modes are: NONE, P720 or P480 (The default is NONE). Note that it only works with HDMI.
These values are the main ones to generate a forwarder.
If you don't want the images on the GamePad and on the TV, just don't add them to the command.
The image of the icons is mandatory to generate the forwarder, if it is not found or does not have the image, the command fails.
Example of Commands:
Homebrew Channel (OHBC) - 480p:
Code:
make TID=0x000100014f484243 APP_NAME="Homebrew Channel 480p" APP_AUTHOR="Dimok" ICON="assets/HBC-ico-480p.png" DRC_SPLASH="assets/HBC-gp-480p.png" TV_SPLASH="assets/HBC-tv-480p.png"Homebrew Channel (OHBC) - 720p:
Code:
make TID=0x000100014f484243 APP_NAME="Homebrew Channel 720p" APP_AUTHOR="Dimok" ICON="assets/HBC-ico-720p.png" DRC_SPLASH="assets/HBC-gp-720p.png" TV_SPLASH="assets/HBC-tv-720p.png"Homebrew Channel (OHBC):
Code:
make TID=0x000100014f484243 APP_NAME="Homebrew Channel" APP_AUTHOR="Dimok" ICON="assets/HBC-ico.png" DRC_SPLASH="assets/HBC-gp.png" TV_SPLASH="assets/HBC-tv.png"Nintendont (WWND), but only on the TV:
Code:
make TID=0x0001000157574e44 APP_NAME="Nintendont" APP_AUTHOR="FIX94" ICON="assets/nintendont.png" DRC_SPLASH="assets/nintendont-gp.png" TV_SPLASH="assets/nintendont-tv.png" DISPLAY_ON=TVUSB Loader GX (UNEO):
Code:
make TID=0x00010001554e454f APP_NAME="USB Loader GX" APP_AUTHOR="USB Loader GX Team" ICON="assets/usbloadergx-ico.png" DRC_SPLASH="assets/usbloadergx-gp.png" TV_SPLASH="assets/usbloadergx-tv.png"WiiFlow (DWFA):
Code:
make TID=0x0001000144574641 APP_NAME="WiiFlow" APP_AUTHOR="Fledge68" ICON="assets/wiiflow-ico.png" DRC_SPLASH="assets/wiiflow-gp.png" TV_SPLASH="assets/wiiflow-tv.png"Part03 - Using the command created in MSys2 and generating the forwarder for Wii U
Launch MSys2 from the Start menu -
- Start > devkitPro > MSys2
Type the command and press enter (Deletes previously created forwarders)
Code:
makeup cleanNow paste the command you created and press enter to generate the forwarder
Homebrew Channel (OHBC) - CompatTitleInstaller Official:
Code:
make TID=0x000100014f484243 APP_NAME="Homebrew Channel" APP_AUTHOR="Dimok" ICON="assets/HBC-ico.png" DRC_SPLASH="assets/HBC-gp.png" TV_SPLASH="assets/HBC-tv.png"The forwarder was generated in the "C:/Boot2vWii" folder as:
Boot2vWii.elf
Boot2vWii.rpx
Boot2vWii.wuhb
The "Boot2vWii.wuhb" file is the forwarder recognized by Aroma, you can delete the other two if you want.
Now just rename it to the name of your choice and copy the files to the Wii U SD card in "SD:/wiiu/apps" or any folder of your choice.
I strongly advise you to create a folder just for forwarders so you can have better management.
*** Extra Information ***
###################################
## Identifying channel IDs (Wad or vWii) ####
###################################
ID and TID
The title ID is the hexadecimal values of the four letters title ID used for the channel.
Example:
WiiFlow
ID = DWFA > TID = 0x0001000144574641
USB Loader GX
ID = UNEO > TID = 0x00010001554e454f
If you have the original wads that were used to install the channels on the vWii side, then the easiest method if you are using Windows is to use ShowMiiWads (I used version 1.5.2 by Leathl (mod by orwel & Brawl)). There is a .NET framework dependency.
ShowMiiWads - https://github.com/modmii/modmii.github.io/raw/master/temp/ShowMiiWads-Mod-1.5.2.zip
Make sure that View is set to ShowMiiWads, then drag your forwarder .wad files to the ShowMiiWads window.
- Title ID is the letter ID that can be used to work out the TID in Boot2vWii
- Alternatively, the Path can be used to easily convert to Boot2vWii TID
Using Nintendont Forwarder - WWND vWii.wad as an example. The Title ID is displayed as WWND and Path as 00010001\57574e44.
00010001\57574e44 converts to TID=0x0001000157574e44
Recognizing channel IDs installed on vWii (Emunand)
If you don't have the original wad files then you can dump the vWii NAND and use ShowMiiWads with View set to ShowMiiNand.
To dump the VWii Nand in a format that can be used by ShowMiiWads, the easiest method I have found is to use USB Loader GX
USB Loader GX - https://github.com/wiidev/usbloadergx
USB Loader GX v3.0-r1281 is used in the following steps:
- Load USB Loader GX
- Edit the path for the NAND backup if required - Settings > Custom Paths > EmuNAND Save Path
- To dump the NAND - Settings > Features > Dump NAND to EmuNAND > Everything
Now in ShowMiiWads:
- Options > Change NAND Backup Path - select folder containing your NAND backup/dump.
- View > ShowMiiNand
Screenshot
I'm sharing the custom forwarders I created for my use, I hope you like them.
Forwarder for WiiU (Aroma)
https://gbatemp.net/attachments/for...446074/?hash=cafaa4aa4eaa8adbba68bec3fc401fdf
Forwarder for WiiU (Aroma) (Complete)
https://www.mediafire.com/file/uezzb6pjgdek8p9/Forwarder_for_WiiU_%28Aroma%29_%28Complete%29.zip/file
Boot2vWii (Project)
https://gbatemp.net/attachments/boot2vwii-project-zip.446075/?hash=cafaa4aa4eaa8adbba68bec3fc401fdf
##############################################
############### Credits and Thanks ###############
##############################################
I would like to thank the developers of the tools and information necessary for me to create this guide, which can help people who are less familiar with the subject.
Without you this tutorial would not exist!
Thanks
WiiDatabase
akadiddy
SammysJunk
FunkyScott47
Useful links
WiiDatabase
https://github.com/WiiDatabase
akadiddy
https://gbatemp.net/threads/boot2vwii-channel.614122/post-10156679
https://gbatemp.net/threads/boot2vwii-channel.614122/post-10158196
SammysJunk
https://github.com/SammyGoesHowdy/SammysJunk/tree/main/Wii U Forwarders
FunkyScott47