We have found that some users are unable to contact their dealers for warranty after a card failure due to cross-border purchases. Other users are out of warranty by expire one year after purchase.
In this situation, the user may be able to get the card back to work with a simple repair or replacement part by themselves.
We have summarized some common failures and repair methods, the following repair methods require professional electronic components soldering skills or tools, we recommend that you can go to the local cell phone repair store to try your luck.
Please note that these are only repair recommendations and do not guarantee 100% that the card can be fully repaired.
1. EZ-FLASH Junior stuck on OSINIT, Sometimes can randomly enter the kernel, but only a bunch of glitch sprites.
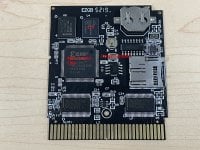
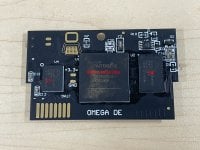
After excluding the fact that the user upgraded the FW5RC. This failure can be determined for the S71 chip solder point failure. The S71 chip is located at the top left corner of the PCB, there are two BGA chips, S71 is the one at the right side. Use a heat gun to re-solder it. Please use high-temperature tape to protect other chips and components around it from being blown away.
2. EZ-FLASH OMEGA/OMEGA Definitive Edition's clock jump like insane.
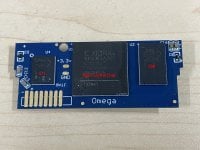
The crystal oscillator on board is damaged, Replace it can fix the problem, the type of the crystal oscillator is OSC 3.3V 3225 24.545Mhz.
3. EZ-FLASH Junior boots with no Nintendo logo, only a ® symbol.
a. The crystal oscillator on board is damaged, Replace it can fix the problem, the type of the crystal oscillator is OSC 3.3V 3225 24.545Mhz. b. Re-solder the main control chip which is the biggest chip on the board. below the two BGA chips in the top left corner.
4. EZ-FLASH OMEGA boots with no Nintendo logo.
The crystal oscillator on board is damaged, Replace it can fix the problem, the type of the crystal oscillator is OSC 3.3V 3225 24.545Mhz.
5. EZ-FLASH OMEGA Definitive Edition boots with no Nintendo logo.
a. The crystal oscillator on board is damaged, Replace it can fix the problem, the type of the crystal oscillator is OSC 3.3V 3225 24.545Mhz. b. The A/B toggle switch may damaged. use the multimeter to check it. If a circuit break is found, replace a switch.
6. EZ-FLASH OMEGA/OMEGA Definitive Edition boots in to blue screen of safe mode every time, but there is no "no loader found" on the bottom of the screen.
The SELECT key of the console is stuck or short-circuit.
7. EZ-FLASH OMEGA/OMEGA Definitive Edition boots in to blue screen of safe mode every time, there is "no loader found" on the bottom of the screen.
The loader of the card is lost. Please read this post to recovery it. https://gameparadise.org/threads/how-to-make-your-sd-card-to-ez-flash-omega-de-recovery-able.2951/
8. EZ-FLASH OMEGA/OMEGA Definitive Edition shows "bad nor id" when updating the kernel
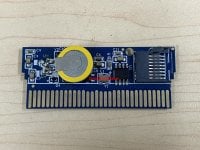
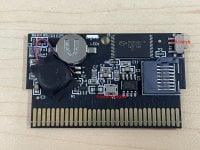
The S71 chip solder point failure. The S71 chip is located at the back side of the PCB. The one at the left side in three chips. Use a heat gun to re-solder it. Please use high-temperature tape to protect other chips and components around it from being blown away.
9. EZ-FLASH OMEGA/OMEGA Definitive Edition gets white screen when direct boot a game. but the same game runs well on the NORFLASH.
Go to the safe mode by power console with SELECT pressed, choose "test card" or "test psram" depends different firmware, look the test result, there is a high probability that S98 error will be displayed. The S98 chip is located at the back side of the PCB. The one at the right side in three chips. Use a heat gun to re-solder it. Please use high-temperature tape to protect other chips and components around it from being blown away.
10. EZ-FLASH OMEGA/OMEGA Definitive Edition write game to NORFLASH getting stuck in fix point.
The S98 chip solder point failure. The S98 chip is located at the back side of the PCB. The one at the left side in three chips. Use a heat gun to re-solder it. Please use high-temperature tape to protect other chips and components around it from being blown away.
A quick way to fix EZ-FLASH OMEGA/OMEGA Definitive Edition get S71 error when test card in the safe mode.
Sometimes there is an S71 error, may be the card screw is too tight, it may cause the PCB deformation and S71 chip false soldering, then you can try to loosen the screw, open the case, reposition the PCB, re-install the case, screwing the screws(not too tight). This will probably be able to have a 1/3 chance to fix S71 error in a quick way.


Last edited:


